Freno a mano singola Trionic
Testo introduttivo
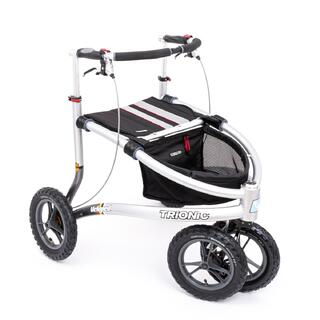
 1 Montaggio: sistema frenante monomanuale Trionic (le immagini mostrano il lato destro)
1. Montare la leva del freno sul manubrio (il più avanti possibile).
2. Svitare le viti (2x 4 pezzi) che fissano la copertura del freno destro e sinistro.
3. Collegare il cavo corto del freno al freno, sullo stesso lato della leva del freno.
4. Assicurarsi che la vite del nipplo terminale del cavo sia rivolta verso l'esterno (direzione ruota).
5. Far passare il cavo del freno più lungo attraverso il telaio (tra il tubo superiore e quello inferiore del telaio).
6. Collegare il cavo del freno più lungo al freno posizionato sul lato opposto della leva del freno.
7. Praticare un piccolo foro (2x) nel tessuto del cestino in corrispondenza di ogni angolo inferiore posteriore (vedere i cerchi ROSSI nell'immagine).
8. Fissare il cavo del freno più lungo al cestino con le 2 fascette.
9. Riposizionare le 2 coperture dei freni, utilizzando le 2 fascette con foro Ø5 mm per le 2 viti superiori (lato D + L).
10. Infilare uno degli assi QR della ruota (Ø12 mm) attraverso l'occhiello della fascetta e stringere la fascetta attorno all'asse (fornisce la tensione corretta per evitare che il cavo sfreghi contro il pneumatico, ma senza che il cavo del freno venga spostato dalla sua direzione).
11. I cavi dei freni lato destro e sinistro possono essere regolati individualmente, utilizzando le viti di regolazione posizionate sul freno oppure le viti di regolazione fissate al duplicatore lineare.
12. Assicurarsi che il freno di stazionamento blocchi completamente la ruota.
 2 Centratura del freno
1. Svitare la vite del collare del freno di 3-4 giri (raggiungibile attraverso il foro del coperchio del freno).
2. Tirare la leva del freno e tenerla stretta.
3. Tenendo ferma la leva del freno, serrare nuovamente la vite del collare del freno.
4. Controllare che la ruota giri liberamente, senza sfregamenti tra freno e mozzo del freno.
Per qualsiasi domanda non esitate a contattare il nostro product manager Stefan Kindberg al numero +46-8-522 100 52.